Tutorial 1.8″ TFT Display with Arduino
Introduction to the 1.8 TFT SPI 128*160 Display Module
The 1.8 TFT SPI 128*160 Display Module is a versatile and compact display solution that can be seamlessly integrated with Arduino boards. This article serves as a comprehensive guide to help you understand the functionalities and capabilities of this display module and how to effectively use it with Arduino.
What is a TFT Display Module?
Have you ever wondered how those vibrant, colorful screens in your gadgets work? Well, chances are, they are using a Thin-Film Transistor (TFT) display module. TFT display modules are popular choices for electronic devices, thanks to their excellent image quality, fast response times, and wide viewing angles. These modules consist of a liquid crystal display (LCD) panel that is backlit by a white LED, resulting in a vivid visual experience.
Overview of the 1.8 TFT SPI 128*160 Display Module
One popular TFT display module available in the market is the 1.8 TFT SPI 128*160 Display Module. As the name suggests, it features a 1.8-inch diagonal screen with a resolution of 128*160 pixels. This compact module comes with a Serial Peripheral Interface (SPI) interface, making it compatible with microcontrollers like the Arduino.
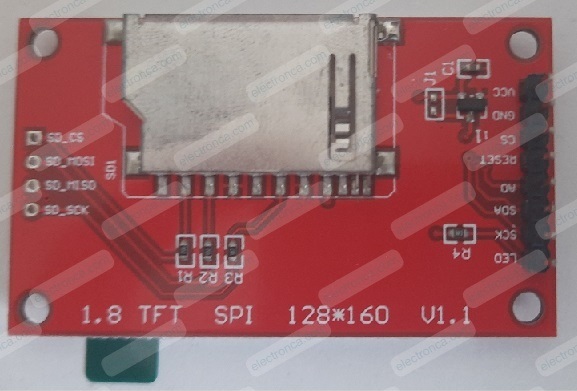
It supports 16BIT RGB 65K color display, and the internal driver IC is ST7735S, which uses 4-wire SPI communication. The module contains an LCD display and a PCB control backplane.
The display can load images from an SD card – it has an SD card slot at the back. The following figure shows the screen front and back view.

Establishing Communication via SPI
To establish communication between the display module and Arduino, you’ll need to connect their SPI pins. The SPI pins on Arduino boards are typically labeled as SCK (clock), MISO (Master-In Slave-Out), MOSI (Master-Out Slave-In), and SS (Slave Select). Connect these pins to their corresponding pins on the display module, ensuring a proper match.
Wiring the Module to the Arduino Board
Gnd to Ground
VCC pin to the Arduino 5v pin
SCK pin to Arduino pin 13
SDA pin to Arduino pin 11.
RESET pin to Arduino pin 8
A0/DC pin to Arduino pin 9
CS pin to Arduino pin 10
LED pin to Arduino 3.3V

Code of the Demonstration
#include <TFT.h> //include tft library
#include <SPI.h> //include spi library

//define pins
#define cs   10
#define dc   9
#define rst  8

//create an instance of the library called TFTscreen
TFT TFTscreen = TFT(cs, dc, rst);

void setup()
{
  Serial.begin(9600);
  TFTscreen.begin(); //initialize the library
  TFTscreen.background(0, 0, 0);
  TFTscreen.setTextSize(2); // set the font size
}

void loop()
{
  //generate a random color
  int redRandom = random(0, 255);
  int greenRandom = random (0, 255);
  int blueRandom = random (0, 255);

  //set the color for the text
  TFTscreen.stroke(redRandom, greenRandom, blueRandom);
  TFTscreen.text("electronca.com", 0, 55); //draw text on the screen
  delay(300);

  //random color for background
  TFTscreen.background(36, 82, 51);
  delay(300);
}
Output of the Example